Microsoft is working on official version of .NET and PowerShell for Server Core R2 installations, the instructions you can use at your own risk, etc., etc.
The problem is that it only ships with traditional cmd.exe and not PowerShell. To make things worse neither PowerShell nor .NET as they are today can be installed on such systems.
Alex Kibkalo and a great post by Artem Pronichkin on installing .NET on Server Core that makes this task easier.
Basically the whole procedure consists of just four main steps:
- Installing Visual C++ Redistributable Packages (required for .NET).
- Installing .NET 2.0 SP1
- Installing PowerShell.
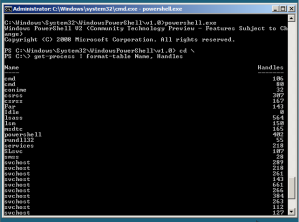
- There it is :” :c:\Windows\System32\WindowsPowerShell\v1.0\powershell.exe”
After that, copy these files to your Server Core computer and simply run them there.
If your Server Core is 32-bit - just run vcredist_x86.exe.
If it is 64-bit, you need to install both x86 and x64 versions (vcredist_x86.exe and vcredist_x64.exe).
2. .NET Framework
This is the most tricky part. PowerShell needs .NET 2.0 and .NET 2.0 is supposed to be a component of Windows Server 2008 so we will have to get a package of the framework which can get installed on such a system. To accomplish that we will:
- Download .NET Framework 3.5.
- Unpack the setup to get access to the .NET 2.0 Service Pack 1 installation files.
- Download and install the Orca MSI editor.
- Use Orca to remove the Windows version check.
- Run the updated MSI.
2.1. Download .NET: Go to Microsoft’s web site and download full redistributable package of .NET 3.5.
2.2. Unpack the file:
a. Create a folder c:\deploy
b. Save the downloaded .NET framework package to this folder.
c. Download the wonderful deploy.cmd script which Artem has posted and put it into the same folder.
d. Run the script.
After the script executes, the C:\Deploy\AIP folder will have both NetFx20_x64 and NetFx20_x86 folders with .NET 2.0 framework files you need.
2.3. Install Orca:
This is great but unfortunately you cannot just install the files because the MSIs are specifically checking for Windows version. So now we need to disable this check. To do this we will use Microsoft’s Orca MSI editor.
Note: This all needs to be done on a regular, not Server Core, machine. We will copy the results of our Orca operations to the Core box later on.
If you don’t have Orca, follow these steps to download it:
a. Download the Windows SDK for Windows Server 2008 and .NET Framework 3.5 installer.
b. Run the installer and deselect everything except Win32 Developer Tools (this will make sure that you only download the few megs you need.)
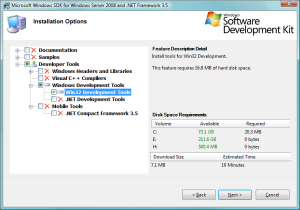
c. After the installation completes, go to C:\Program Files\Microsoft SDKs\Windows\v6.1\Bin and install Orca.msi.
2.4. Tweak the setup:
Now its time to do some patching.
a. Start Orca and open the MSI you need (C:\Deploy\AIP\NetFx20_x86\NetFx20a_x86.msi for 32-bit version or C:\Deploy\AIP\NetFx20_x64\NetFx20a_x64.msi for x64).
b. Click Component.
c. In x86 locate: Regtlib.exe_Tool_____X86.3643236F_FC70_11D3_A536_0090278A1BB8
In x64 locate that one and Regtlib.exe_Tool_____A64.3643236F_FC70_11D3_A536_0090278A1BB8
d. Change the Condition from (VersionNT < 600) or Version9X to just VersionNT or Version9X.
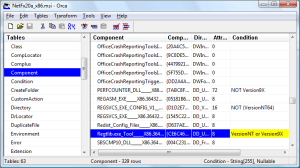
e. Save changes (either to that same MSI or a transform file.)
2.5. Install .NET
Copy the files (the whole folder) to your core machine and start the MSI via this command line (note that you need to use msiexec in order to pass the vsextui=1 parameter):
If you saved a transformed file and are running 64-bit version you will probably run:
%SystemRoot%\system32\msiexec.exe /package "NetFx20_x64\NetFx20a_x64.msi" vsextui=1 transforms="ServerCore.mst"
On x86 without a transform that would be:
%SystemRoot%\system32\msiexec.exe /package "NetFx20_x86\NetFx20a_x86.msi" vsextui=1
That’s it. Now we have .NET installed and can go to the final step - PowerShell installation!
3. Windows PowerShell
There is no PowerShell v1 setup for Windows 2008 (again, because it is supposed to be a component) but you can actually download and install the CTP (note: this is a pre-beta code - not for production use). PowerShell v2 CTP2 is available from Microsoft’s downloads page.
Download the version you need, copy the msi over to the Server Core box and simply run the msi.
4. Now you can start PowerShell!
Just run:
c:\Windows\System32\WindowsPowerShell\v1.0\powershell.exe
And you will see the prompt change to: PS C:>
That’s it. Now you are among the first geeks in the Universe to have PowerShell on Server Core!